
- Why change the barrel on your AR
- Changing Barrel Calibers
- How to Remove the AR 15 Barrel or AR 10 Barrel
- Remove the Complete AR Upper Receiver
- Removing Optics and Accessories
- AR 15 and AR 10 Front Barrel Guards
- AR 15/ AR 10 Gas System and Flash Suppressor
- Supporting the Upper Housing without Special Tools
- Remove the Flash Suppressor from the AR 15 or AR10
- Remove the Gas block and Tube
- How to remove the Barrel from the AR 15 and AR 10
- Choosing a new AR 15 Barrel or AR 10 Barrel
- Getting Ready to Install your new AR Barrel
- Final Assembly of the Complete Rifle
- AR 15 Barrel Break in and AR 10 Barrel Break-in
Installing a new barrel onto you AR15 or AR10 may seem like a daunting task. But it really does not have to be. The AR platform offers a multitude of caliber and barrel choices. This makes the rifle so adaptable to perform different tasks. In this article, we will walk you through the process of changing the barrel in your AR 10 or AR 15. We will show you all the tools required, the tightening torques, and techniques used to perform this easy job.
Why change the barrel on your AR
The Barrel on any rifle is a consumable component. This means that every time we shoot a small amount of wear happens. The wear happens in both the rifling and at the chamber end. Wear at the chamber end is usually in the throat area. When the powder charge is ignited, and the bullet begins to travel down the barrel there is still powder burning as it leaves the cartridge case. The burning powder coupled with the chamber pressure will over time erode the throat area of the chamber and accuracy will suffer.

The other area of wear on the barrel is in the rifling. Even though the copper jacket on a bullet is soft when compared to the barrel it will still wear the barrel. Every time a bullet travels down the barrel there is friction between the bullet and the barrel. It is this friction that will slowly erode the barrel away. An average barrel will have a life of between 3000 to 5000 rounds. After which accuracy will begin to be lost as wear sets in.
Changing Barrel Calibers
Not all barrel changes need to be due to a worn-out barrel. Because both the AR 10 and AR 15 models have such a wide choice of available calibers sometimes, we may just want to try something different. One of the big advantages of changing calibers but keeping the same basic rifle is that the rifle will still fit and feel the same to the shooter.

For this article, I am going to changing my AR 10 from .308 Winchester to the
Minimal Changes required
Another advantage of changing from .308 Winchester to the

When making a caliber change it is important to price out all the parts needed to make the conversion first. If changing your AR 15 to a caliber like .300 Black Out, then just a barrel will work. This is because the .300 blackout will use the same bolt and magazines. However, if changing to the 6.5 Grendel which will require a new bolt carrier group and magazines as well it might be cheaper to buy a whole new upper assembly. Often a complete upper can be cheaper than buying the parts separately.

How to Remove the AR 15 Barrel or AR 10 Barrel
Once you have decided to change the barrel, (we will go into barrel choices a later in the article), it is time to remove that old barrel. Firstly, I want to say that this article covers both the AR 15 and AR 10 models. This is because the procedure is the same on both rifles. The tools required differ slightly, but I will show what is required for each rifle.

The first thing to do before getting started is to make sure the rifle is unloaded. It is also best to remove any ammunition from the work area. That way there is no chance of an accidental discharge. Make sure to remove the magazine, then pull the bolt back making sure there is nothing in the chamber.
Remove the Complete AR Upper Receiver
Push out the rear takedown pin and open up the rifle. Remove the bolt carrier assembly from the upper housing. Then push out the front takedown pin and lift the complete upper off the lower.

Removing Optics and Accessories
With the upper assembly on the bench remove any optics or sighting systems from the Picatinny rail. Make sure to mark or make a note of the position of the optic on the rail to make re-assembly easier. You also want to go ahead and remove any other accessories that might be mounted to the upper.

AR 15 and AR 10 Front Barrel Guards
Next up is going to be the front handguard. The AR 15 and AR 10 models can have a multitude of different handguards fitted. Each type can be slightly different from each other in appearance. However, the removal procedure is going to be about the same. On our rifle, we have a free-floating handguard that is secured by 6 screws.

To remove it I am going to remove the screws, taking note of any different length screws and their location. With the screws out the handguard will just twist off.

AR 15/ AR 10 Gas System and Flash Suppressor
With the front handguards removed the gas block and tube will be exposed. These will need to be removed before we can undo the barrel nut. The front flash suppressor will also need to be removed to slide off the gas block. To remove the flasher suppressor, we need to secure the upper receiver into the vise using a vise block.

This is where the AR 15 and AR 10 holding tools are going to differ. The AR-15 will typically use the clamshell tool that fits over the housing and clamps into a vice. Whereas the AR 10 will use a block that inserts into the bottom of the receiver and locates on the pins. Another way to do this job without either of those tools is to use a vise and a set of soft jaws.
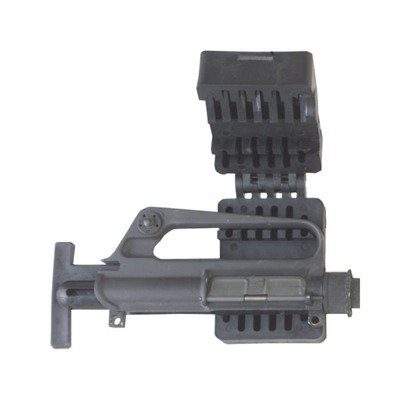
Supporting the Upper Housing without Special Tools
If the upper assembly on your rifle uses a flat Picatinny rail, then you can support it in a vice without using either tool. You have to be careful and it is advisable to use soft jaws, but it can be done. Simply lay the upper on its side and carefully clamp the upper between the rail and the lower portion of the housing.

Remove the Flash Suppressor from the AR 15 or AR10
With the upper supported in the vice unscrew the flash suppressor from the front of the barrel. On rifles that use a crush washer to between the barrel and the muzzle device, it should be easy to undo. If the rifle is fitted with a muzzle brake or suppressor mount, then the odds are it is also held with Loctite. To remove a muzzle brake that has been installed with Loctite apply heat from a propane torch. Apply pressure to the muzzle brake while heating it then unscrew it.
Remove the Gas block and Tube
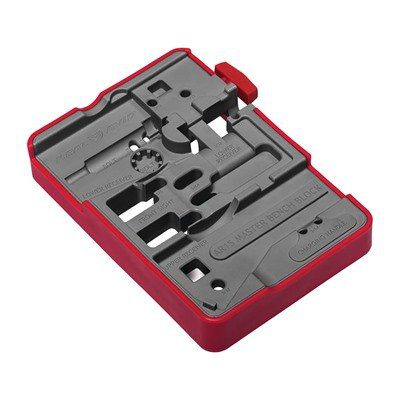
Next, you will need to remove the gas block. Gas blocks that are secured with a set screw or pinch screw are the easiest to remove. Simply unscrew the fasteners and twist the block back and forth while applying pressure towards the muzzle end. On barrels that have a fixed front sight, you will need to drive out the two retaining pins before twisting off the front sight. Using the AR 15 Master Bench Block form Real Avid tools will make this a much easy job.
How to remove the Barrel from the AR 15 and AR 10
Now that the gas system and flash suppressor have been removed all that is left is to undo the barrel nut. If using the original style Delta ring nut, you want to use a AR 10/15 Armors wrench. When using a free-floating handguard, you may have to use a special wrench that is specific to the brand of the handguard. Simply install the wrench onto the barrel nut and rotate counterclockwise to undo the nut. Barrel nuts can be tight to undo, especially if the rifle is an older gun and has been used quite a bit. Make sure that upper housing is supported properly so as not to damage it.

Once the nut has been loosened completely unscrew it and remove it from the barrel. To remove the barrel from the housing simply pull it forward out of the housing.

Choosing a new AR 15 Barrel or AR 10 Barrel
If you are replacing a worn barrel and you were happy with the old barrel’s length and caliber then your choices are going to be easy. Simply look up the desired length and barrel type and choose from the available manufacturers. Reading reviews on each barrel will help narrow down the choice. If you like the original barrel, then choose that manufacturer again.

When changing calibers, the process is going to be the same but may take just a little more research. Specific calibers will work better at specific barrel lengths. Ideally, it is best to select the ideal barrel length to match the round you are planning on shooting. (check out our article on how to choose an AR rifle it will go into more detail). You also have to factor in the functionality of the length.
Our AR 10 Barrel Swap
On our build, we are swapping out the 18″ .308 Winchester barrel for a 20″
When choosing a manufacturer, I had two factors I considered cost and quality. This is always going to be one of the biggest factors that influence the choice. Ideally, I would like to buy the best barrel made but in reality, I just cannot afford it. So, I started reading reviews and watching for barrels on sale online. When I saw a barrel come up that the company had good reviews and was in my price range, I bought it.
Getting Ready to Install your new AR Barrel
Once you have received your new barrel take it out of the box. Look it over to make sure that it is the right one that you ordered. If everything is all good set the barrel on the bench and grab the upper receiver. The upper receiver should be cleaned before installing the new barrel. You should wash out the entire piece using solvent and make sure the threads for the barrel nut are clean and in good condition.
To install the new barrel, slide the chamber end of the barrel into the upper receiver making sure that the locating pin fits snugly into the slot on the upper receiver. The barrel should be a nice firm fit and should not be able to be rotated. You should, however, not have to force the two pieces together.

Installing and tightening the Barrel Nut for the AR 15 or AR 10
Depending on the front handguard being used the barrel nut will need to be indexed correctly. If using the delta ring style nut the grooves on the nut will need to be aligned with the gas tube port on the upper receiver. This is the reason for the variable torque specification on the barrel nut. The tightening torque for the barrel nut is 30 to 45 Ft/Lb, this is so that the nut can be properly aligned.
On our application where the barrel nut is used to also attach the front handguard. This means that the location of the screws holes on the nut needs to be indexed correctly. Our system uses shims between the barrel and the nut to change the final tightened position of the nut.

Aligning the Barrel Nut
To install the nut, apply a thin coat of grease to the upper receiver threads. Thread the barrel nut onto the receiver and torque to the low setting of 30 Ft/lbs. Then check the gas tube alignment if required tighten the nut further to align as required.
Gas Blocks and tubes
The next item to be installed is the gas block and gas tube. I would recommend replacing the gas tube at this time. You could also update the front gas block to an adjustable type if you like. When you slide on the gas block make sure that it is aligned on the top of the barrel and seated up against the machined edge on the barrel. To check the gas block alignment to the barrel drilling blow through the gas tube with compressed air. You should be able to feel air coming out of the barrel.


Front Hand Guards
Now the barrel and gas system have been reinstalled its time to re-install the front handguard. Verify that you have installed the ejection port cover as most of the time the handguard will stop the pin from coming out. Make one final check to make sure that the gas block is tight then slide the handguard over the barrel. Secure the guard using the original screws
Installing the Muzzle Brake or Flash Suppressor
If the barrel you are using uses a crush wash to lock the flash suppressor in place, then you will need to install a new one. Tighten the Flash suppressor until the ports are aligned correctly. Do not overtighten the flash hider. If you go past the correct alignment you will need to replace the crush washer and repeat the installation.

For flash suppressors that do not use a crush washer apply a small amount of red Loctite to the barrel threads. Then screw on the muzzle brake/suppressor and tighten. When using a muzzle brake, it will need to be aligned correctly. To align the muzzle brake correctly install shims between the barrel and the brake. So, when the brake is tightened the ports are arranged correctly.

Checking Head Space on the New Barrel
Now that the barrel is installed on the upper the next thing to do is to check the headspace. To do this you will need a set of headspace gauges in the caliber you are shooting with. Headspace gauges come in three sizes, Go, No Go, and Field gauges.
- The “Go” gauge represents a new in size chamber, the bolt should close easily on the Go gauge
- A “No Go” gauge is a longer gauge and the bolt should not close on it. If the bolt does close it does not mean that the rifle is not safe to use more that it will not be as accurate and have a shorter life span.
- The “Field” gauge is the longest gauge. If the bolt will completely close on a field gauge it is best not to shoot it.
If you find any issues with checking the headspace, I recommend contacting the barrel manufacturer or taking the rifle to a gunsmith.

Test your gun
Final Assembly of the Complete Rifle
That is about it for changing the barrel. Now, all that is left is to re-assemble any optics or other accessories back on to the rail. Before reconnecting the upper to the lower I would take the time to clean out the trigger group and lube as required. Check out our article on how to clean your AR for cleaning tips.

AR 15 Barrel Break in and AR 10 Barrel Break-in
With the rifle all back together its time to hit the range and break in the barrel. There is a bunch of different methods to break in a barrel. The method that I use is the same as the military uses.
- Clean the barrel with a dry patch to remove any oil residue
- Fire one shot then clean the barrel using a brush and copper solvent
- Repeat this process for a total of 10 rounds, firing one at a time and cleaning after each shot.
- Next fire a 5 shot string, allow the barrel to cool and then repeat step 2
- Repeat step 4 two more times, cleaning after each 5 round string for a total of 15 rounds fired
Once you have finished the break-in procedure the barrel is ready to be put into normal use.
All that is left is to reset your scope or sights to zero and you are ready to go out and shoot…
Stay safe and shoot often
need pics on aligning barrel nut or more pics of barrel nut would help. Love the tools and tips.
T…